Oxidizing the Kubernetes operator
Some applications are hard to manage in Kubernetes, requiring lots of manual labor and time invested to operate them. Some applications might be hard to set up, some need special care for restarts, some both. It’s individual. What if the knowledge of how to operate an application could be extracted into a dedicated software, relieving human operators ? That is exactly what Kubernetes operators are about. An operator, a.k.a. custom controller automates what a human operator would do with the application to make it run successfully. First, Kubernetes is taught about the application to be operated by the custom controller. This is simply done by creating a custom resource. Custom resources end up extending the Kubernetes API, making Kubernetes recognize the resource. The operator then watches events of such custom resource and acts upon them, hence the name custom controller - a controller for custom resources.
Rust is an extraordinary language for operators to be implemented in. A typical Kubernetes operator ends up making lots of calls to the Kubernetes API. Watching resources states, creating new ones, updating/deleting old ones. Also, an operator should be able to manage multiple resources at a time, ideally in parallel. Rust’s asynchronous programming model is a perfect match for building high performance/throughput operators. If a threaded runtime, such as tokio is used, vast amount of custom resources can be managed in parallel by the operator. Rust is ahead-of-time compiled language with no runtime, no garbage collection pauses and with C-level performance. An operator typically resides inside a Pod in Kubernetes. Such a pod can be restarted at any time. Near-instant startup time minimizes delay before state of managed resources is handled by the operator again. Rust also guarantees memory safety and eliminates data races. This is especially helpful for heavily concurrent/parallel applications, like Kubernetes operators.
One strong reason to use Rust for building Kubernetes operators is error handling in Rust. When managing Kubernetes resources via the Kubernetes API, there are numerous points of failure - network, API unavailable, Kubernetes resources availability problems, including nodes being restarted etc. The kube-rs crate is written using idiomatic Rust and makes sure all points of failure are properly propagated and can’t be simply ignored. Critical operations always leverage Result and Either to thoroughly describe all possible outcomes and force the programmer to take care of them.
Rust offers all the tools required to build an operator.
- Kubernetes client library: kube-rs - A user-friendly library for interaction with Kubernetes, including custom resource definitions, watchers and much more.
- Kubernetes API binding: kubernetes-openapi - API bindings to interact with Kubernetes API directly. Mostly automatically generated, just like other Kubernetes API clients for other platforms. The kube-rs crate uses it internally.
Typically, the kube-rs crate is the tool of choice. It embraces Rust’s asynchronous programming model and provides useful abstractions over Kubernetes API.
Implementing an operator
This article comes with a complete, ready to run source code available on GitHub: Rust Kubernetes operator example. The following chapter will describe and explain snippets of code from this very repository. The goal of this article is to create a fully functional, yet minimal implementation of an Operator. Operator best practices and advanced techniques will be a subject of other articles.
The goal is to build an operator spawning instance of REST API Echo service, using the inanimate/echo-server Docker image.
Project setup
With Rust installed, create a new package with a binary target using cargo new operator --bin. Inside the project folder (operator/), edit the Cargo.toml file’s dependencies section:
1
2
3
4
5
6
7
8
9
10
11
12
[dependencies]
tokio = { version = "~1.0", features = ["macros", "rt-multi-thread"] } # Macros for easy project setup and testing, multi-threaded runtime for best utilization of resources
kube = { version = "~0.52", default-features = true, features = ["derive"] } # Library for talking to Kubernetes API
kube-derive = "~0.52" # Support for Custom Resource Definitions
kube-runtime = "~0.52" # Custom controller support
k8s-openapi = { version = "~0.11", default-features = false, features = ["v1_17"] } # Kube-rs depends on k8s-openapi
futures = "~0.3"
# All serde dependencies are used to serialize/deserialize CRDs and other Kubernetes-related structs
serde = "~1.0"
serde_json = "~1.0"
schemars = "~0.8"
thiserror = "~1.0" # Custom Error definitions and convenient error mappings
The kube is complemented with two additional crates distributed separately. There is kube-derive for Kubernete’s Custom Resource Definition support and kube-runtime, containing components for building Kubernetes operators. This way, developers may use only the parts required for a particular use case. In this article, a fully-fledged operator is built, including a custom resource definition. Therefore, all three crates are used.
For testing, a Kubernetes cluster is required. There are many options. On Linux, K3S.io is among the best options, if not the best. Lightweight, easy to install and functional out of the box. By invoking the curl -sfL https://get.k3s.io | sh - command, the latest version of K3S is installed, and a KUBECONFIG is placed at /etc/rancher/k3s/k3s.yaml. The KUBECONFIG is usually readable only by root. Make sure the user you’re currently logged in as has access privileges using chown/chmod. In order for the operator to function, it needn’t be deployed into the Kubernetes cluster itself, as long as it can talk to the Kubernetes API. To make the KUBECONFIG visible to the operator, please export path to it as the KUBECONFIG environment variable: export KUBECONFIG=/etc/rancher/k3s/k3s.yaml.
If any kubernetes-related operations presented in this article do not work for you, a general advice would be to check the permissions - different Kubernetes clusters come with different permissions for its user accounts by default. The above-mentioned K3S creates a cluster-admin role by default with all the permissions required.
Creating a CustomResourceDefinition
To make Kubernetes recognize a custom resource, it’s definition must be created first. The custom resource definition defines which fields are to be expected in custom resource’s specification, which are required or optional and how the input should be validated. The process of creating CRDs is explained in detail in the official documentation.
1
2
3
4
5
6
7
8
9
10
11
12
13
14
15
16
17
18
19
20
21
22
23
24
25
26
27
28
29
apiVersion: apiextensions.k8s.io/v1
kind: CustomResourceDefinition
metadata:
  name: echoes.example.com
  namespace: default # For easier deployment and avoid permissions collisions on most clusters, the resource is namespace-scoped. More information at: https://kubernetes.io/docs/tasks/extend-kubernetes/custom-resources/custom-resource-definitions/
spec:
  group: example.com
  names:
    kind: Echo
    plural: echoes # If not specified, Kubernetes would assume the plural is "Echos"
    singular: echo
    shortNames:
      - echo
  scope: Namespaced
  versions:
    - name: v1
      served: true
      storage: true
      schema:
        openAPIV3Schema:
          type: object
          properties:
            spec: # There is only one (required) field named "replicas" specifying how many pods are created by the Operator
              type: object
              properties:
                replicas:
                  type: integer
                  format: int32
              required: ["replicas"]
Note: The CRD could be applied to the Kubernetes cluster by the operator itself. This scenario is of little use in the real world, as the user/service account the operator runs under doesn’t have permissions to manipulate CRDs. Therefore, it must be applied manually. Some standardized service like OperatorHub.io or OpenShift certified operators make this process less painful for the user by automating the CRD creation, yet the principle remains the same: the running operator doesn’t have the privileges to manipulate its own CRD.
Use kubectl apply -f echoes.example.com.yaml to create the CRD in Kubernetes. use kubectl get crds to verify.
How Kubernetes and Operator work together
An operator is another name for a controller over a custom resource, hence custom resource controller. There are many built-in kinds of resource, each with its own controller, e.g. Pods and PodsController or Deployments with DeploymentController. Custom resources are created in Kubernetes via it’s REST API, typically by the user. Users don’t call Kubernetes API directly, but rather use different, simpler to use means like kubectl, which call Kubernetes API internally. In order to create a custom resource, it’s definition (CRD) mentioned in the previous chapter must be known to Kubernetes first.
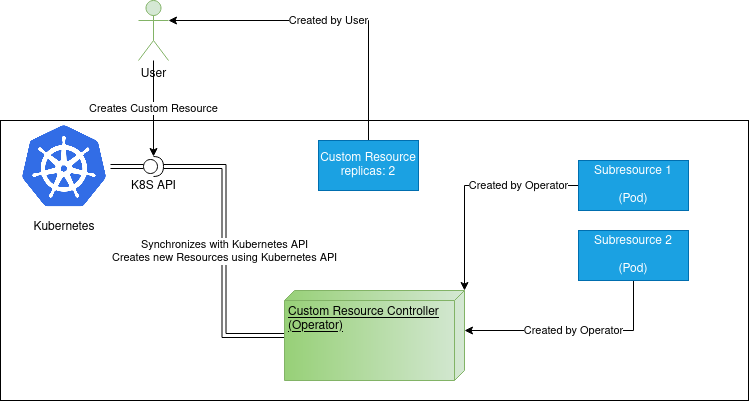
In case of the Echo resource, a user would use kubectl apply -f echo-example.yaml, where the echo-example.yaml file contains desired state of the given resource:
1
2
3
4
5
6
7
8
# Example of Echo deployment. The operator will receive this specification and will create a deployment of two "echo" pods.
apiVersion: example.com/v1
kind: Echo # Identifier of the resource type.
metadata:
  name: test-echo # Name of the "Echo" custom resource instance, may be changed to your liking
  namespace: default # Namespace must exist and account in KUBECONFIG must have sufficient permissions
spec:
  replicas: 2 # Number of "Echo" pods created.
The kubectl tool would send this YAML to Kubernetes via it’s REST API and Kubernetes would then create a new “record” about the resource. However, Kubernetes itself takes no action on its own, as Kubernetes doesn’t know how to operate Echo resource. Now it’s time for the operator/custom controller to take over and behave just like any other Kubernetes controller should - make sure the state of the test-echo resource, as described by the user, matches reality. In the example above, the user requested a cluster of Echo servers of 2 replicas. In this simple example, the operator uses native Kubernetes resource named Deployment to spawn two pods, each with one distinct REST API Echo service. Yet before the operator can do that, it has to know about the test-echo resource being created. In Rust, the synchronization with Kubernetes via it’s REST API has already been implemented by the kube-runtime crate, built on top of the kube crate. In fact, both crates originate in the same repository. The kube-runtime crate takes care of synchronization with Kubernetes events, noticing any changes done to custom resources managed by the custom controller, using the Kubernetes REST API. This is also the reason why an operator needn’t run in a Pod inside the Kubernetes cluster itself. The part talking to Kubernetes API is abstracted away by the kube_runtime::Controller struct.
Note: If you wish to know details about how kube-runtime synchronizes state with Kubernetes, see the Controller module of the crate.
Creating a custom Controller
In order to create a Custom controller a new instance of kube_runtime::Controller must be created. The kube crates heavily leverage the great asynchronous programming model of Rust. Therefore, an async runtime is required. The kube crate uses Tokio internally, therefore using it is a sensible option. For real-world operators, it is recommended to use a runtime capable of parallel task execution, e.g. tokio = { version = "~1.0", features = ["macros", "rt-multi-thread"] }, as many custom resources and subresources may be spawned in parallel. In fact, kube is able to reconcile many custom resources in parallel while making sure one specific resource is reconciled one update at a time.
With Tokio.rs in place, create an async main method using Tokio’s macro
1
2
3
4
5
6
7
8
9
10
11
12
13
14
15
16
17
18
19
20
21
22
23
24
25
26
27
28
29
30
31
32
#[tokio::main]
async fn main() {
    // First, a Kubernetes client must be obtained using the `kube` crate
    // The client will later be moved to the custom controller
    let kubernetes_client: Client = Client::try_default()
        .await
        .expect("Expected a valid KUBECONFIG environment variable.");

    // Preparation of resources used by the `kube_runtime::Controller`
    let crd_api: Api<Echo> = Api::all(kubernetes_client.clone());
    let context: Context<ContextData> = Context::new(ContextData::new(kubernetes_client.clone()));

    // The controller comes from the `kube_runtime` crate and manages the reconciliation process.
    // It requires the following information:
    // - `kube::Api<T>` this controller "owns". In this case, `T = Echo`, as this controller owns the `Echo` resource,
    // - `kube::api::ListParams` to select the `Echo` resources with. Can be used for Echo filtering `Echo` resources before reconciliation,
    // - `reconcile` function with reconciliation logic to be called each time a resource of `Echo` kind is created/updated/deleted,
    // - `on_error` function to call whenever reconciliation fails.
    Controller::new(crd_api.clone(), ListParams::default())
        .run(reconcile, on_error, context)
        .for_each(|reconciliation_result| async move {
            match reconciliation_result {
                Ok(echo_resource) => {
                    println!("Reconciliation successful. Resource: {:?}", echo_resource);
                }
                Err(reconciliation_err) => {
                    eprintln!("Reconciliation error: {:?}", reconciliation_err)
                }
            }
        })
        .await;
}
and create a new kube_runtime::Controller instance inside. The Controller’s business logic is represented by two FnMuts:
- Reconciler,
- Error policy.
The reconciler is a function which takes a mutable instance of CRD of type T, in case of this example T = Echo. It contains the main business logic of the operator. If reconciliation inside the reconciler function fails, the error may optionally be handled inside the error policy FnMut. Both are arguments of the run method, called on an existing instance of Controller. However, the constructor of Controller requires additional arguments: an Api<T> and a ListParams. The Api<T> comes from the kube crate and can be generally thought of as an abstraction over CRUD operations upon resources. The resource type is represented by the generic parameter T. Again, in case of this example, T = Echo. The Api<Echo> instance serves the Controller to interact with Kubernetes API and manipulate Echo resources - a basic use case is to watch for any changes. In order to create Api<Echo>, a Kubernetes client has to be created. One of the simples ways is to look for a KUBECONFIG using defaults/conventions. This typically tries to look for KUBECONFIG environment variable with path to kubeconfig set as a value first.
1
2
3
let kubernetes_client: Client = Client::try_default()
    .await
    .expect("Expected a valid KUBECONFIG environment variable.");
Without Kubernetes client, the operator couldn’t function and there isn’t much to be done about this. Therefore the simple error handling using expect on a Result coming out of the try_default function.
The ListParams instance is created to tell the Controller how to list and whether to filter out the Echo custom resource. A default instance equals listing all Echo resources.
In the main entrypoint, the Echo struct is mentioned several times. How it is defined ? Using macros named CustomResource and kube from the kube crate. The Echo struct itself will be created by the #[kube(...) macro, and it needn’t be created manually.
The code looks as follows.
1
2
3
4
5
6
7
8
9
10
11
12
13
14
15
16
17
18
19
use kube::CustomResource;
use schemars::JsonSchema;
use serde::{Deserialize, Serialize};

/// Struct corresponding to the Specification (`spec`) part of the `Echo` resource, directly
/// reflects context of the `echoes.example.com.yaml` file to be found in this repository.
/// The `Echo` struct will be generated by the `CustomResource` derive macro.
#[derive(CustomResource, Serialize, Deserialize, Debug, PartialEq, Clone, JsonSchema)]
#[kube(
    group = "example.com",
    version = "v1",
    kind = "Echo",
    plural = "echoes",
    derive = "PartialEq",
    namespaced
)]
pub struct EchoSpec {
    pub replicas: i32,
}
The struct is named EchoSpec, as it corresponds to the Echo CRD v1 spec body. Just like in the YAML definition of the Echo resource, there is only one field names replicas, telling the operator how many pods with the Echo service will be created.
1
2
3
4
5
6
7
8
9
10
11
12
apiVersion: apiextensions.k8s.io/v1
kind: CustomResourceDefinition
metadata:
  name: echoes.example.com
# Multiple lines omitted
            spec:
              type: object
              properties:
                replicas:
                  type: integer
                  format: int32
              required: ["replicas"]
See the Echo CRD definition in the crd.rs file on GitHub.
Implementing the operator logic
The purpose of the Echo operator is to spawn REST API echo services - a simple service that repeats the content of a http request. And the number of pods corresponds to the number of replicas set. To keep things simple, this example operator uses a Deployment to achieve that. The deployment will consist of n pods, each with inanimate/echo-server docker container running inside.
Such a logic should be hidden in the reconcile FnMut accepted by the run method of a kube_runtime::Controller.
1
2
3
4
// Omitted
    Controller::new(crd_api.clone(), ListParams::default())
        .run(reconcile, on_error, context)
// Omitted
The reconcile function is defined as follows.
1
2
3
async fn reconcile(echo: Echo, context: Context<ContextData>) -> Result<ReconcilerAction, Error> {
    // Implementation omitted
}
The echo: Echo argument is the instance of Echo custom resource that just got updated and needs to be handled by the reconciler. The update could not be only creation of the resources, it could just as well be a modification or deletion. The context is an instance of ContextData struct, a custom struct
1
2
3
4
struct ContextData {
    /// Kubernetes client to make Kubernetes API requests with. Required for K8S resource management.
    client: Client,
}
that carries only Kubernetes client from the kube crate. Context is created in the main function and automatically “injected” by the Kubernetes controller at each call of the reconcile function. The Kubernetes client is used to create subresources like Deployments and update the Echo resource itself.
The reconcile function also returns Result<ReconcilerAction, Error>. In case Error is returned, the on_error logic is automatically triggered by the kube_runtime::Controller. ReconcilerAction says what to do after a successful reconciliation. The resource might be schedules to be re-checked later, or simply never to be returned to again - unless an update by the user is made of course.
The reconcile function must handle multiple possible states of the Echo resource.
1
2
3
4
5
6
7
8
9
10
11
12
13
14
15
16
17
18
19
20
21
22
23
24
25
26
27
28
29
30
31
32
33
34
35
36
37
async fn reconcile(echo: Echo, context: Context<ContextData>) -> Result<ReconcilerAction, Error> {
    let client: Client = context.get_ref().client.clone(); // The `Client` is shared -> a clone from the reference is obtained


    let namespace: String = match echo.namespace() {
        None => {
            // If there is no namespace to deploy to defined, reconciliation ends with an error immediately.
            return Err(Error::UserInputError(
                "Expected Echo resource to be namespaced. Can't deploy to an unknown namespace."
                    .to_owned(),
            ));
        }
        Some(namespace) => namespace,
    };

    // Performs action as decided by the `determine_action` function.
    return match determine_action(&echo) {
        Action::Create => {
            let name = echo.name();
            finalizer::add(client.clone(), &name, &namespace).await?;
            echo::deploy(client, &echo.name(), echo.spec.replicas, &namespace).await?;
            Ok(ReconcilerAction {
                requeue_after: Some(Duration::from_secs(10)),
            })
        }
        Action::Delete => {
            echo::delete(client.clone(), &echo.name(), &namespace).await?;
            finalizer::delete(client, &echo.name(), &namespace).await?;
            Ok(ReconcilerAction {
                requeue_after: None, // Makes no sense to delete after a successful delete, as the resource is gone
            })
        }
        Action::NoOp => Ok(ReconcilerAction {
            requeue_after: Some(Duration::from_secs(10)),
        }),
    };
}
Such basic states are:
- The
Echoresource has just been created and no subresources are created yet, - The
Echoresource is set to be deleted, - The
Echoresource is in desired state and there is nothing to be done.
In real world, there are many other possible states. For example, the Echo resource might be updated by the user and changes to subresources (Deployment in this case) must be made accordingly. Then there are unexpected states, like deletion of subresources and their recovery by the operator. Or cases when the operator is restarted in the middle of creating the required subresources and only a fraction of work is done. Such scenarios are omitted for simplicity in this example, yet those do exist and real-world operator should be prepared for them and react accordingly.
Therefore, after obtaining the client from the context and checking there is a namespace defined on the Echo resource, an action to take upon the Echo resources is decided by the determine_action function. There are only three possible outcomes represented by the Action enum.
1
2
3
4
5
enum Action {
    Create,
    Delete,
    NoOp,
}
Create simply means to create a deployment with the Echo service pods, Delete means there is a deletion timestamp on the Echo resource and subresources must be deleted first. Finally, NoOp means the resource is in desired state and nothing should be done.
How does the determine_action function, defined as
1
2
3
4
5
6
7
8
9
fn determine_action(echo: &Echo) -> Action {
    return if echo.meta().deletion_timestamp.is_some() {
        Action::Delete
    } else if echo.meta().finalizers.is_none() {
        Action::Create
    } else {
        Action::NoOp
    };
}
decides which action should be taken ? First, the Echo resource is checked for presence of a deletion timestamp. A deletion timestamp signalizes the resource is meant to be deleted. Yet Kubernetes can’t just delete it and be done with it. Before it is deleted, all the subresources must be deleted first. And again, only the operator knows how to do that. How does Kubernetes know it has to wait for the operator to delete the subresources ? Due to the presence of a finalizer record. Second, if the object is not meant to be deleted, it’ll check if a finalizer is already present. This indicates (with great amount of simplification) the resources were already created. If it’s not present, it’ll decide to create the resources. If it is, then the resources were already created and resulting action is NoOp, or simply put “do nothing”. Note: Resource updates are not handled for simplicity.
Finalizers
Finalizers are described in the official Kubernetes documentation as well. Simply put, adding a finalizer into resource’s metadata, Kubernetes will NOT delete the resource until the finalizer is removed. Typically, the operator inserts the finalizer as a first thing when the resource is seen for the first time. When the resource is deleted, after all the subresources are deleted as well, the finalizer is deleted as a last thing. There is a reason for this - the operator might crash or be restarted at any time during resource creation/deletion. To prevent resource leaks, the operator cleans up the resources first, and then removes the finalizer.
Before any resources are actually created, notice how a finalizer record is put into the Echo’s metadata.
1
2
3
4
5
6
7
8
        Action::Create => {
            let name = echo.name();
            finalizer::add(client.clone(), &name, &namespace).await?;
            echo::deploy(client, &echo.name(), echo.spec.replicas, &namespace).await?;
            Ok(ReconcilerAction {
                requeue_after: Some(Duration::from_secs(10)),
            })
        }
It is also removed after a successful deletion:
1
2
3
4
5
6
7
        Action::Delete => {
            echo::delete(client.clone(), &echo.name(), &namespace).await?;
            finalizer::delete(client, &echo.name(), &namespace).await?;
            Ok(ReconcilerAction {
                requeue_after: None, // Makes no sense to delete after a successful delete, as the resource is gone
            })
        }
Finalizers are a simple array of strings in resource’s metadata. Creation and deletion of finalizers in a simplified form is to be found in finalizer.rs file.
Creating and deleting deployments
The operator creates a deployment with n pods running inanimate/echo-server:latest docker image inside on Action::Create and deletes it on Action::Delete. The complete source code for echo deployment creation and deletion can be found in the echo.rs file.
Once again, the Api<T> struct instance type to T = Deployment is used: let deployment_api: Api<Deployment> = Api::namespaced(client, namespace);. The Deployment is created in the namespace defined in the Echo resource’s metadata using deployment_api.create(&PostParams::default(), &deployment).await
Note: See how every interaction with Kubernetes API is represented by a Future. Many operations may be handled concurrently/in parallel easily, resulting in great performance.
The Deployment of the Echo REST service is defined as an instance of k8s_openapi::api::apps::v1::Deployment struct, a direct counterpart do a Kubernetes v1 Deployment:
1
2
3
4
5
6
7
8
9
10
11
12
13
14
15
16
17
18
19
20
21
22
23
24
25
26
27
28
29
30
31
32
33
34
35
36
let deployment: Deployment = Deployment {
    metadata: ObjectMeta {
        name: Some(name.to_owned()),
        namespace: Some(namespace.to_owned()),
        labels: Some(labels.clone()),
        ..ObjectMeta::default()
    },
    spec: Some(DeploymentSpec {
        replicas: Some(replicas),
        selector: LabelSelector {
            match_expressions: None,
            match_labels: Some(labels.clone()),
        },
        template: PodTemplateSpec {
            spec: Some(PodSpec {
                containers: vec![Container {
                    name: name.to_owned(),
                    image: Some("inanimate/echo-server:latest".to_owned()),
                    ports: Some(vec![ContainerPort {
                        container_port: 8080,
                        ..ContainerPort::default()
                    }]),
                    ..Container::default()
                }],
                ..PodSpec::default()
            }),
            metadata: Some(ObjectMeta {
                labels: Some(labels),
                ..ObjectMeta::default()
            }),
            ..PodTemplateSpec::default()
        },
        ..DeploymentSpec::default()
    }),
    ..Deployment::default()
};
Port 8080 is exposed, as the tool listens on it by default.
Running the operator
First, make sure the Kubernetes cluster is running and the Kubeconfig contains an account with sufficient privliges to create+list+update+delete Deployments. Listing and Updating the echoes.example.com custom resource are also a must. The K3S.io Kubernetes mentioned in the beginning of this article is super-lightweight and easy to set up. However, it doesn’t work on macOs or Windows.
- Rust must be installed :]
- Git clone the Rust kubernetes operator example from GitHub.
- (Optional) Install Kubernetes, K3S.io is an excellent choice on Linux, installed simply with
curl -sfL https://get.k3s.io | sh -. Make sure to sudo chown /etc/rancher/k3s/k3s.yaml $USER if you’re accessing the Kubernetes cluster using the kubeconfig at/etc/rancher/k3s/k3s.yamlas non-root user. Also,export KUBECONFIG=/etc/rancher/k3s/k3s.yaml, so the operator can find the kubeconfig. - Point the
KUBECONFIGenvironment variable to a valid kubeconfig, e.g.export KUBECONFIG=/etc/rancher/k3s/k3s - Use
kubectl apply -f echoes.example.com.yaml(a file in the repository) to create the CustomResourceDefinition inside Kubernetes. - Run the operator using
cargo run. It will run outside of the Kubernetes cluster and connect to the Kubernetes REST API using the account inside theKUBECONFIGautomatically.
Finally, a custom Echo resource can be created with kubectl apply -f echo-example.yaml. A new deployment of two pods with Echo REST API service will be created. This can be checked with the kubectl get pods or kubectl get deployments command.

Additional resources
A German company Stackable.de creates many operators in Rust, with common code shared in operator-rs. These are all based on the kube crate.
Also, the kube crate itself provides an always up-to-date examples directory.